Kokosmilch Kefir
Unser Rezept für Kokosmilch-Kefir enthält eine kleine Menge Zucker, um die Fermentation der Kokosmilch zu Kefir zu unterstützen, aber es ist eine großartige Option für diejenigen, die eine modifizierte Keto-Diät einhalten. Verwenden Sie dies als Flüssigkeit in einem Müsli auf Kokosbasis aus ungesüßten Kokosflocken, gehackten Nüssen und einer kleinen Handvoll frischer Beeren. Die Beeren liefern eine kleine Menge an Kohlenhydraten, aber sie tragen dazu bei, die Mahlzeit auszugleichen und ihr eine sättigendere Textur zu verleihen.
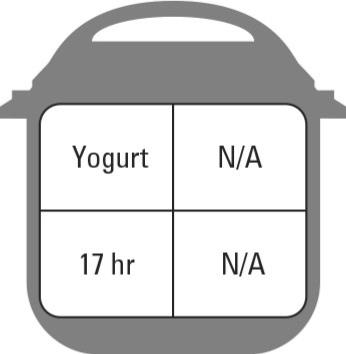
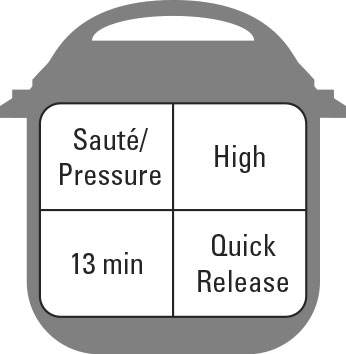
Instant Pot-Funktion: Joghurt
Spezialwerkzeuge: Sofort ablesbares Thermometer, Vorratsgläser aus Glas
Passt zu Diäten: Glutenfrei, Keto, Vegan, Vegetarisch
Zubereitungszeit: 5 Minuten
Kochzeit: 17 Stunden
Ausbeute: 9 Portionen
Zutaten
Zwei 13,5-Unzen-Dosen ungesüßte Kokoscreme
2 Esslöffel Kokosjoghurt mit lebenden Aktivkulturen oder 1 Kapsel (entleert) probiotisches Pulver
2 Esslöffel Ahornsirup
2 Teelöffel geschmacksneutrale Gelatine
Richtungen
Geben Sie die Kokoscreme in den Instant Pot, schließen Sie den Deckel und drücken Sie die Joghurt- Einstellung zweimal, bis auf dem Bildschirm Kochen angezeigt wird . Sichern Sie den Deckel.
Wenn der Instant Pot piept, nehmen Sie den Deckel ab und überprüfen Sie die Temperatur; es sollte mindestens 180 Grad lesen. Wenn dies nicht der Fall ist, stellen Sie es auf Sauté und erhitzen Sie es weiter, bis es 180 Grad erreicht.
Machen Sie in Ihrer Küchenspüle ein Eisbad, das zu Ihrem Topf passt. Stellen Sie den Topf in das Eisbad. Rühren Sie ständig, bis die Milch den Temperaturbereich von 105 bis 110 Grad erreicht hat. Dann den Kokosjoghurt oder das probiotische Pulver, den Ahornsirup und die Gelatine einrühren. 1 Minute weiterrühren.
Wischen Sie den Topfboden trocken. Legen Sie es in den Instant Pot zurück und verschließen Sie den Deckel.
Drücken Sie die Einstellung Joghurt , stellen Sie die Zeit auf 16 Stunden ein und drücken Sie Start.
Wenn der Kefir fertig ist, gießen Sie kochendes Wasser in die Vorratsgläser. 5 Minuten ruhen lassen, dann das Wasser abgießen und die Gläser an der Luft trocknen lassen. Gießen Sie den Kefir in die Gläser, verschließen Sie die Deckel und bewahren Sie ihn bis zu 10 Tage im Kühlschrank oder bis zu 1 Monat im Gefrierschrank auf.
Je länger Sie den Kefir fermentieren, desto wahrscheinlicher wird er zu einer dünnen, joghurtartigen Konsistenz.
Vermeiden Sie Honig als Süßungsmittel. Die Bakterien im Honig konkurrieren mit den Probiotika.
Nachdem der Kefir fertig ist, frische Beeren untermischen und bis zu 3 Tage lagern. Wenn Sie ein dickeres Produkt bevorzugen, versuchen Sie, vor dem Kühlen 1 Teelöffel Tapiokamehl einzurühren.

Pochierte Eier
Wenn Sie ein Fan von Eiern sind, dürfen Sie sie trotzdem bei der Keto-Diät genießen! Eier sind eine nährstoffreiche Wahl, die perfekt zu einigen kohlenhydratarmen Gemüsesorten wie gehacktem Brokkoli, Spinat und Pilzen passt! Sie können auch etwas Cheddar-Käse und gehacktes Fleisch für eine proteinreichere Mahlzeit hinzufügen. Unser Rezept für pochierte Eier ist ein großartiger Anfang.
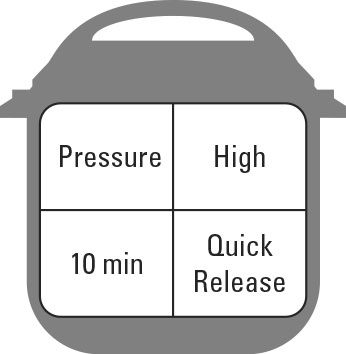
Instant Pot-Funktion: Steam (High), Quick Release
Spezialwerkzeug: Silikon-Muffinförmchen
Passt zu Diäten: Glutenfrei, Keto, Mediterran, Vegetarisch
Vorbereitungszeit: Keine
Kochzeit: 4 Minuten
Ausbeute: 4 Portionen
Zutaten
4 große Eier
1 Tasse Wasser
Richtungen
Sprühen Sie 4 Silikon-Muffinförmchen mit Kochspray ein und schlagen Sie 1 Ei in jeden Muffinförmchenhalter.
Stellen Sie die Muffinförmchen auf den Untersetzer. Gießen Sie das Wasser in den Topf und senken Sie den Untersetzer vorsichtig in den Topf. Verschließen Sie den Deckel und stellen Sie ihn auf Dampf (Hoch). Stellen Sie die Zeit auf 4 Minuten ein.
Wenn der Garvorgang abgeschlossen ist, drücken Sie zum Entlüften auf Abbrechen und Quick Release .
Mit einem Löffel die Eier vorsichtig aus der Auskleidung schöpfen.
Für ein festeres Eigelb die Kochzeit auf 5 Minuten erhöhen. Für ein weicheres pochiertes Ei die Kochzeit auf 3 Minuten verkürzen.
Rinderknochenbrühe
Avoid paying the high price for a glorified bone broth at your local market, and make your own in your Instant Pot. Our Beef Bone Broth recipe is an excellent way to bring rich flavor to the low-carbohydrate soups that tend to be prominent on the keto diet. Plus, bone broth is a great source for many vitamins and minerals because of the bone used to flavor the broth.
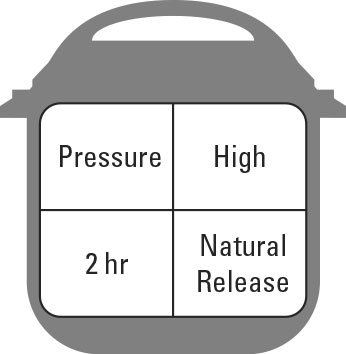
Instant Pot function: Pressure Cook (High), Keep Warm (On), Natural Release
Special tools: Glass storage jars
Fits diets: Gluten-Free, Keto, Mediterranean
Prep time: None
Cook time: 2 hours
Yield: 10 servings
Ingredients
3 pounds beef bones
3 large carrots, chopped
3 celery stalks, chopped
1 large onion, chopped
1/2 teaspoon dried thyme
1/4 cup parsley
1 bay leaf
1/4 teaspoon peppercorns
2-1/2 quarts filtered water
Directions
Combine the bones, carrots, celery, onion, thyme, parsley, bay leaf, and peppercorns in the Instant Pot; then pour the filtered water over the top.
Secure the lid and set to Pressure Cook (High) and Keep Warm (On) or use the Soup/Broth setting. Set the time for 120 minutes using the +/– button and press Start.
When cooking completes, do a Natural Release of the pressure for 30 minutes.
Carefully remove the pot from the Instant Pot with oven mitts. Strain the stock with a colander into a clean bowl, and discard the bones and vegetables. Store in the refrigerator up to 5 days or in the freezer up to 4 months.
You can use onion skins, celery stems, and the tops of celery in stock.
To make a rich and robust beef stock roast the bones in the oven for an hour at 400 degrees.
Beef Bone Broth
Avoid paying the high price for a glorified bone broth at your local market, and make your own in your Instant Pot. Our Beef Bone Broth recipe is an excellent way to bring rich flavor to the low-carbohydrate soups that tend to be prominent on the keto diet. Plus, bone broth is a great source for many vitamins and minerals because of the bone used to flavor the broth.
Instant Pot function: Pressure Cook (High), Keep Warm (On), Natural Release
Special tools: Glass storage jars
Fits diets: Gluten-Free, Keto, Mediterranean
Prep time: None
Cook time: 2 hours
Yield: 10 servings
Ingredients
3 pounds beef bones
3 large carrots, chopped
3 celery stalks, chopped
1 large onion, chopped
1/2 teaspoon dried thyme
1/4 cup parsley
1 bay leaf
1/4 teaspoon peppercorns
2-1/2 quarts filtered water
Directions
Combine the bones, carrots, celery, onion, thyme, parsley, bay leaf, and peppercorns in the Instant Pot; then pour the filtered water over the top.
Secure the lid and set to Pressure Cook (High) and Keep Warm (On) or use the Soup/Broth setting. Set the time for 120 minutes using the +/– button and press Start.
When cooking completes, do a Natural Release of the pressure for 30 minutes.
Carefully remove the pot from the Instant Pot with oven mitts. Strain the stock with a colander into a clean bowl, and discard the bones and vegetables. Store in the refrigerator up to 5 days or in the freezer up to 4 months.
You can use onion skins, celery stems, and the tops of celery in stock.
To make a rich and robust beef stock roast the bones in the oven for an hour at 400 degrees.
Seasoned Pulled Pork
Our Seasoned Pulled Pork recipe is very rich, mainly from the fattier pork shoulder used in the recipe. The recipe suggests pairing this with a simple coleslaw, which traditionally is high in fat from mayonnaise. But if you’re on the keto diet, we recommend pairing this recipe with low-carbohydrate veggies to add more fiber to your diet and prevent some of the unfortunate side effects of a high-fat diet, like constipation.
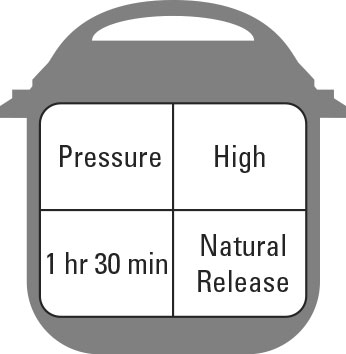
Instant Pot function: Pressure Cook (Normal), Keep Warm (Off), Natural Release
Special tools: Meat thermometer
Fits diets: Gluten Free, Keto
Prep time: 5 minutes
Cook time: 1-1/2 hours
Yield: 12 servings
Ingredients
2 tablespoons blackened seasoning
2 teaspoons garlic powder
1 teaspoon onion powder
1 teaspoon paprika
1/2 teaspoon ground black pepper
1/4 teaspoon salt
4 pounds bone-in pork shoulder
2 cups chicken broth
1 bay leaf
Directions
In a large bowl, mix together the blackened seasoning, garlic powder, onion powder, black pepper, and salt. Add the pork shoulder, and rub the spices into the pork shoulder, covering the entire surface area.
Place the seasoned pork shoulder into the inner pot of the Instant Pot. Top with the remaining spices from the bowl. Pour the chicken broth over the top, add in the bay leaf, and secure the lid.
Set the valve to Sealing and select Pressure Cook (Normal) and Keep Warm (Off), using the +/– button to set the time to 90 minutes.
The final internal temperature of the pork should reach 145 degrees. When cooking completes, do a Natural Release of the pressure for 25 minutes.
Switch the valve to Venting and allow the remaining pressure (if any) to release. Remove the lid and discard the bone, bay leaf, and any excess visible fat from the inner pot.
Using two large forks, begin to shred the pork directly into the broth and spice mixture. Serve immediately.
For a smaller pork shoulder, adjust the time accordingly with the estimate of 22 minutes per pound.
Serve with cabbage slaw on top of a Hawaiian sweet roll or on its own over a salad for a keto-friendly option.
Switch up your seasonings and add your favorite spice blend! If you’re using barbecue sauce, wait until the final stages of serving to add.
Carne Guisada
Though Carne Guisada is traditionally served with tortillas, to remain keto compliant you can serve it alongside some butterleaf lettuce or spoon it into a halved avocado. Avocados are a nutrient-rich food that helps to provide satiety alongside the better-for-you fats that aren’t found in meats.
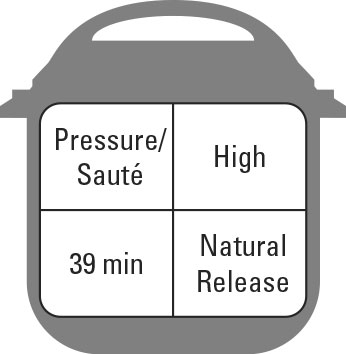
Instant Pot function: Pressure Cook (High), Keep Warm (On), Natural Release, Sauté (High)
Fits diets: Gluten-Free, Keto
Prep time: 10 minutes
Cook time: 39 minutes
Yield: 8 servings
Ingredients
3 pounds beef stew meat, cubed
2 cups beef stock
2 tablespoons tomato paste
1 tablespoon dried oregano
1 teaspoon cumin
4 garlic cloves, chopped
1 large onion, chopped
1 large green bell pepper, chopped
1-1/2 teaspoons salt
2 tablespoons cornstarch
2 tablespoons cold water
Directions
Place the cubed stew meat into the Instant Pot and add the beef stock, tomato paste, oregano, cumin, cloves, onion, bell pepper, and salt. Stir to combine the ingredients, and secure the lid.
Press Pressure Cook (High) on the Instant Pot, adjust the time to 35 minutes using the +/– button, with Keep Warm (On). Do a Natural Release of the pressure for 15 minutes.
Using a slotted spoon, remove the meat to a serving bowl.
In a small bowl, whisk together the cornstarch and water.
Press Sauté (High) and, while whisking, add in the cornstarch slurry. Bring the sauce to a low simmer about 4 minutes; then ladle over the meat and serve.
If you prefer a smoother gravy, use an immersion blender or regular blender to blend the gravy before serving. Work in small batches with a towel over the top of the blender. Serve with flour tortillas or over rice, mashed potatoes, or cauliflower rice.
Korean Beef Bulgogi Bowl
Our Korean Beef Bulgogi Bowl recipe does call for sugar, but to remain keto compliant, you can substitute the brown sugar with stevia or monk fruit. This delicious recipe can certainly fit into your low-carb meal plan when paired with a simple cauliflower rice. Cauliflower rice is a freezer-friendly staple, so you won’t have to spend hours in the kitchen ricing your own.
Instant Pot function: Sauté (High), Pressure Cook (High), Keep Warm (Off), Quick Release
Prep time: 5 minutes
Cook time: 13 minutes
Yield: 4 servings
Ingredients
1/3 cup filtered water
1/4 cup low-sodium soy sauce
2 tablespoons rice wine vinegar
2 tablespoons packed brown sugar
2 teaspoons sesame oil
1 teaspoon ground ginger
2 tablespoons cornstarch
1-1/4 pounds lean ground beef
1/2 small onion, chopped
1 teaspoon minced garlic
2 cups chopped bell peppers
2 cups cooked brown rice, divided
2 cups Basic Brown Rice
1 stalk of green onion, chopped, for garnish
1/2 teaspoon red pepper flakes, for garnish
4 teaspoons Sriracha, for garnish
Directions
In a small bowl, whisk together the water, soy sauce, rice wine vinegar, brown sugar, sesame oil, ginger, and cornstarch. Set aside.
Press Sauté (High) on the Instant Pot and add the ground beef. When the beef begins to brown (about 3 minutes), add in the onion, garlic, and bell peppers. Continue to cook for 5 minutes. When finished, press Cancel.
Stir in the sauce and select Pressure Cook (High) and Keep Warm (Off), adjust the timer to 5 minutes using the +/– button, and secure the lid. Ensure the vent is set to Sealing.
When the cooking completes, press Cancel, remove the lid, stir, and portion into 4 bowls, served over 1/2 cup of Brown Jasmine Rice. Garnish as desired with green onion, red pepper flakes, and Sriracha.
To make the recipe keto compliant, substitute a sugar replacement for the brown sugar. Because sugar substitutes are sweeter than sugar, use half the amount. Then serve with cauliflower rice.
Use a tamari sauce in place of soy to make the recipe gluten-free.

Turkey and Mushroom Meatloaf
Nothing is worse than showing up to an event without something to eat! That’s why our prep-ahead Turkey and Mushroom Meatloaf can be a keto follower’s best friend for a weekend away. Going camping? Cook ahead and modify by using an almond flour in place of the breadcrumbs. Reheat to 165 degrees (yes, you can do this over an open flame in the woods), and you’ll have a nourishing meal (not out of a package) in a matter of minutes.
Instant Pot function: Sauté (High), Pressure Cook (High), Keep Warm (Off), Natural Release
Special tools: Three 4-inch loaf pans
Fits diets: Gluten-Free, Keto, Mediterranean
Prep time: 10 minutes
Cook time: 45 minutes
Yield: 6 servings
Ingredients
1 teaspoon extra-virgin olive oil
1/4 small onion, chopped
1 teaspoon minced garlic
3 large white mushrooms, finely diced
1 pound lean ground turkey
1 large egg
1 teaspoon Italian seasoning
1/2 teaspoon ground black pepper
1/8 teaspoon salt
1 tablespoon fresh chopped basil
1/2 cup whole-wheat breadcrumbs
6 tablespoons barbecue sauce
1 cup water
Directions
Press Sauté (High) on the Instant Pot, and place the oil in the inner pot. Add the onion, garlic, and mushrooms. Sauté for 10 minutes, until the mushrooms are tender. Press Cancel.
In a large bowl, combine the mushroom mixture with the ground turkey. Add in the egg, Italian seasoning, pepper, salt, basil, and breadcrumbs. Mix until uniformly combined. Liberally spray three 4-inch aluminum loaf pans with cooking spray. Divide the turkey mixture evenly into the loaf pans and top each loaf with 2 tablespoons of barbecue sauce.
Cover the loaf pans with aluminum foil. Rinse the inner pot and dry the outside. Place the insert back into the Instant Pot, and pour the water in. Position the metal trivet on the bottom and place 2 loaf pans on top; place the remaining loaf pan horizontally across the bottom pans. Close the lid and set to Sealing.
Press Pressure Cook (High) and Keep Warm (Off), and use the +/– button to set the timer to 35 minutes. When cooking completes, do a Natural Release of the pressure for 5 minutes, and then use Quick Release to remove the remaining pressure.
Remove the foil from the loaf pans, slice and serve.
These make an excellent freezer-friendly meal to enjoy later. Just reheat until the internal temperature of the meatloaf is 165 degrees.

Garlic Green Beans and Tomatoes
Green beans are non-starchy vegetables (along with artichokes, bok choy, cabbage, celery, mushrooms, and spinach — think of vegetables that grow aboveground.) Though tomatoes are a bit higher in carbohydrates, when eaten in moderation, they can absolutely fit into a keto diet! Pair our Garlic Green Beans and Tomatoes recipe with any meat, and we promise, you’ll be satiated and satisfied!
Instant Pot function: Pressure Cook (High), Keep Warm (On), Quick Release
Fits diets: Gluten-Free, Mediterranean, Vegan, Vegetarian
Prep time: 5 minutes
Cook time: 1 minute
Yield: 6 servings
Ingredients
1/2 cup water
1 pound fresh green beans, ends removed
2 cloves garlic, minced
1 lemon, zested and juiced
1/4 cup extra-virgin olive oil
1/2 teaspoon salt
1/4 teaspoon pepper
1/8 teaspoon onion powder
1 small red onion, thinly sliced
1 cup halved cherry tomatoes
Directions
Place the water into the inner pot of the Instant Pot. Add the green beans. Cover with the lid, set the valve to Sealing, and press Pressure Cook (High) and Keep Warm (Off). Adjust the time to 0 minutes using the +/– button.
Meanwhile, in a small bowl, whisk together the garlic, lemon zest, lemon juice, olive oil, salt, pepper, and onion powder.
When the cooking completes, do a Quick Release, and immediately place the green beans in an ice bath for 1 minute. (This helps retain the bright green color and halts the cooking process.)
In a serving bowl, toss the green beans, red onions, and cherry tomatoes together. Drizzle with the dressing, toss, and serve.
Use fresh asparagus instead of green beans for a seasonal twist.
1
Cheese Fondue with Jalapeños
Our Cheese Fondue with Jalapeños is a party-friendly appetizer that you and your friends on the keto bandwagon can enjoy! Serve this recipe alongside celery sticks, cauliflower, radishes, or even rolled meats. Remember, though: This is a pretty high-sodium dish, so be mindful of your portions and drink lots of water.
Instant Pot function: Pressure Cook (High), Keep Warm (Off), Quick Release
Special tools: Instant Pot–friendly casserole dish
Fits diets: Gluten-Free, Keto, Vegetarian
Prep time: 5 minutes
Cook time: 10 minutes
Yield: 8 servings
Ingredients
One 12-ounce can cheese soup
1/2 cup plain Greek yogurt
8 ounces shredded reduced-fat cheddar cheese
One 8-ounce canned diced jalapeño
1/2 teaspoon garlic powder
1 tablespoon yellow mustard
1/2 teaspoon paprika
1/4 teaspoon ground black pepper
1/4 teaspoon salt
1-1/2 cups water
1/4 cup chopped parsley, for garnish
Crusty bread, for serving
Tortilla chips, for serving
Directions
In a medium bowl, mix the cheese soup, yogurt, cheddar cheese, jalapeño, garlic powder, yellow mustard, paprika, pepper, and salt. Pour into an Instant Pot–friendly casserole dish and cover tightly with foil.
Press Pressure Cook (High) and Keep Warm (Off), and set the timer for 10 minutes using the +/– button.
Add the water to the base of the metal pot insert and place the metal trivet over the water. Position the pan on top of the trivet and secure the lid. Set the valve to Sealing.
When the cooking completes, press Cancel. Use Quick Release to remove the pressure.
Carefully remove the pan from the Instant Pot and discard the foil. Stir the cheese fondue one more time, and garnish with parsley.
Serve with crusty bread or tortilla chips, or use as a topping for tacos, nachos, or burgers.
If you prefer less-spicy foods, you can omit the jalapeños.
1
Spiced Walnuts and Cashews
Müssen Sie einen süßen Zahn befriedigen, aber erkennen Sie, dass Keto bedeutet, Nein zu Ihren Lieblingsdesserts zu sagen? Dann ist unser Rezept für gewürzte Walnüsse und Cashewnüsse eine großartige Wahl. Walnüsse sind reich an Omega-3-Fettsäuren, einem herzgesunden Fett, das nachweislich viele vielversprechende Wirkungen im Körper hat. Bei der Zubereitung dieses Rezepts können Sie den Ahorn durch allgemein zugelassene Zuckeraustauschstoffe der Keto-Diät wie Stevia, Mönchsfrucht, Erythrit oder Xylit ersetzen.
Aber Vorsicht: Wenn Sie noch nicht mit Zuckeraustauschstoffen vertraut sind, achten Sie auf die Portionen und sehen Sie, wie Ihr Körper darauf reagiert. Manche Menschen berichten von Magenproblemen beim Verzehr von Zuckeraustauschstoffen.
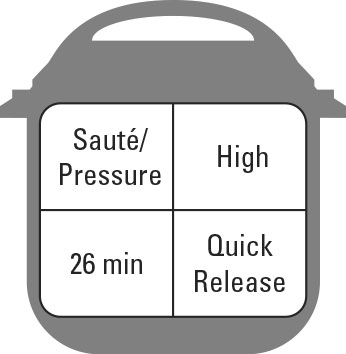
Instant Pot-Funktion: Sautieren (Hoch), Schnellkochen (Hoch), Warmhalten (Aus), Schnellverschluss
Passt zu Diäten: Glutenfrei, Keto, Mediterran, Vegan, Vegetarisch
Vorbereitungszeit: Keine
Kochzeit : 26 Minuten
Ausbeute: 12 Portionen
Zutaten
1/4 Tasse reiner Ahornsirup
1 Teelöffel Vanilleextrakt
1 Teelöffel gemahlener Zimt
1 Teelöffel gemahlene Kurkuma
1/2 Teelöffel gemahlene Muskatnuss
1/4 Teelöffel Cayennepfeffer
2 Tassen Walnusshälften, roh
1 Tasse Cashewkerne, roh
1/3 Tasse Wasser
1/2 Tasse getrocknete Cranberries
2 Esslöffel Sesamkörner
1/2 Teelöffel Salz
Richtungen
Drücken Sie Anbraten (High) auf der Instant Pot. In den Metalltopf Ahornsirup, Vanille, Zimt, Kurkuma, Muskatnuss und Pfeffer geben. Umrühren und langsam die Walnüsse und Cashewkerne dazugeben und etwa 4 Minuten kochen lassen.
Drücken Sie Abbrechen . Fügen Sie das Wasser hinzu, rühren Sie um und schließen Sie den Deckel. Stellen Sie das Ventil auf Versiegeln, drücken Sie Schnellkochtopf (Hoch ) und Warmhalten (Aus) und stellen Sie den Timer mit der Taste +/– auf 8 Minuten. Währenddessen den Backofen auf 300 Grad vorheizen.
Wenn der Garvorgang abgeschlossen ist, drücken Sie Abbrechen und verwenden Sie Quick Release , um den Druck zu entfernen.
Ein umrandetes Backblech mit Pergamentpapier auslegen und mit Kochspray einsprühen. Preiselbeeren, Sesam und Salz in den Topf geben und mit den Nüssen vermischen.
Die Nussmischung auf dem Backblech verteilen. In den Ofen schieben und 8 Minuten backen, umrühren und dann die restlichen 6 Minuten backen. Aus dem Ofen nehmen und 10 Minuten abkühlen lassen. Aufschlag.
Um dieses Rezept keto-konform zu machen, verwenden Sie 2 bis 3 Tropfen Mönchsfrucht- oder Stevia-Extrakt anstelle des reinen Ahornsirups.
Kaufen Sie rohe Nüsse aus den Großbehältern und bewahren Sie sie für optimale Frische im Gefrierschrank auf.
Verwende Mandeln und Pekannüsse für die Nüsse und tausche getrocknete Mangostücke gegen die Cranberries.